Showing posts with label Animal Print. Show all posts

January 8, 2012

For the New Year

Hello everyone! Sorry for the late post for the beginning of the New Year! :( I've been so busy working, that I even hit overtime hours at work, despite being a part time! LOL. I need to take advantage of that since school will be starting in about a little over 2 weeks! Anyways, before the New Year, my cousins came to visit me from Atlanta without their mom for the first time since November :(. It definitely wasn't the same but they definitely needed to keep the tradition of their mom coming here a few times a year. I stayed by my cousin for more than a week and she felt sad when I wasn't sleeping next to her the night I left. :'( But I am glad she and her brother came because it keeps my grandma happy and company while they are here. Anyways, to make it short, my cousin also stayed over my house so I did her nails and my nails. :P Her nails were based off of my nails and I added onto my nails based off of what I did on hers :P


For my nails, you can't really see the colors as well as I thought they would show up on my camera. But I tried to do the ombre mixed nails with Catrice Let's Mauve On on my pinky, China Glaze Something Sweet with OPI Teenage Dream layered over it on my ring finger, OPI DS Reserve on my middle finger, OPI Glitzerland on my index finger and for my thumb I have Misa Spark My Heart That's A Start. I also want to start displaying my rings along with my nails, something different each time to also display my growing collection of rings :P The bird ring was ~$4 on eBay, and I ordered the black version as well! I liked this ring because I believe Forever21 had a ring like this but I didn't get a chance to get my hands on it. And it is a two finger ring.


I added the leopard print on my thumb after I added it onto my cousin's ring finger as her accent nail. I used China Glaze Something Sweet for the spots.


For my cousin's nails, I did OPI Teenage Dream layered over China Glaze Something Sweet, because she really liked the layering combination on me. :P And as she saw me taking pictures of my nails, she wanted some "professional" pictures of her nails as well! LOL. The ring is from H&M for ~$6? The ring was one of my first rings that I got when I started with my ring collection.


This last picture is the current picture of my desk space that I rearranged after I got the jewelry stand, the sparkly K and the Hello Kitty (right underneath the K) for my secret santa this year (THANKS SO MUCH JENN♥♥) and I love it!!! Also, my cousin got me a Hello Kitty picture frame holder that says hello. I have some pictures to add but I haven't added them because my mom says they're going to get dusty, so she wants to laminate them and then put them up there. Also the pink and green Hello Kitty Plush and the Panda Hello Kitty was given to me by my cousin too! The Hello Kitty picture is something I got last year when they were launching the Hello Kitty collection in Sephora. The white organizational divider holds my highlighters for studying in the back, my nail tools in the front and my base and top coats on the side. It's magnetic but it doesn't hold itself up with so many things in it, so I have 2 watch boxes underneath it to make it higher for when I have pictures on the picture holder. 


Thanks for stopping by and happy polishing! :)
Katherine

August 19, 2011

Leopard Tutorial

Hello! Today is a tutorial for leopard/cheetah print! :) You don't necessarily have to use the same color combinations I did, and you can mix and come up with your own. Hope you enjoy! 

First, you start with your base color and in this case, I used Essence Color & Go White Secrets. 


Next step is to make "random" spots and I used China Glaze Golden Spurs for this. You can make it in different shapes, whether it's like an oval or just a random blotch.


Next I used Kiss Nail Art Paint in Black and slightly made a 'C' on the spot and made a backward C on the other side of the spot BUT not connecting to the first C.


Continue doing this on the other spots and then I added 3 random black spots to fill in the empty space.


And this is the end of the tutorial. Make sure you seal your nail art with top coat but be sure it's dry before you apply the top coat or else it will smear. Sometimes it happens to me even though I let it dry for a long time too. So apply top coat with caution!

I hope you enjoyed and happy polishing! :)
<3katherine

August 15, 2011

"Classic" Cheetah/Leopard Combo

Hello everyone! Sorry for the lack of posts, I've been working 3 days straight after having 2 days of rest from when I came back home and boy am I exhausted! I haven't worked that much in a while either! Today's post is another color combination scheme of the cheetah/leopard print, which I will try to do more combinations of so that I can experiment on color combinations that work well together.

I have swatched a few polishes which I will try to have resized and posts scheduled so I won't seem like I'm abandoning the blog. I do have a package I'm waiting for and then I will try to squeeze in a giveaway as well.

For this color combination, I've gone back to the classic - brown cheetah/leopard print. For the base I used 2 coats of China Glaze Golden Spurs which is lighter than the normal brown and it includes a gold shimmer as well. The base of the accent nail is 3 coats of Essence Color & Go White Secret and to complete the print, I used Golden Spurs and a black nail art brush.


The Hello Kitty Pez was one of the things I brought back from Atlanta :). I got it at the Dollar Tree, which makes me even happier because normally Pez is about $2 (?), I forget because I haven't gotten them in a long time (probably when I was a kid).

Hope you enjoyed and happy polishing! :)
<3katherine

December 27, 2010

Classic Leopard


The picture shows the snow from LAST NIGHT which was already around the middle of my shins (around 10pm) because I really had to use the bathroom and we were 2 blocks from home so they told me to go home first. And when my parents got home (from the car) around 12-1am-ish, they said the snow was at their knees. It's even higher now & it's approx. 20 inches here in Brooklyn, which is a little bit outside of Manhattan. Luckily, some teenagers offered to shovel the front of our house. So my dad doesn't have to work so hard at it because it's been a tiring night and day since the car kept sliding yesterday on the way home, which made me realize that I will buy a 4 wheel drive car in the future.


So here's my first swatch + nail art (repeat) for China Glaze Classic Camel. Classic Camel is a beige-cashmere-kinda creme with gold glitter. It took 2 coats to reach the bottle color. The formula was a little thick and wonky, maybe because of the glitter not mixing very well with the creme? But top coat smoothed it over and made it look beautiful. Maybe for me, it feels odd for me to have it on my nails, not maching? IDK! Lol, but I like it. :)


* There's no regular picture only flash picture of the swatch because the regular no flash picture doesn't show the true color of Classic Camel.


* I don't know why my camera doesn't focus on the whole picture and it usually blurs out one nail at least :( I used zoom a little bit to 1.3 because flash close up sometimes ruins the outcome of the nail picture.

anyways, here's one of a few posts today! hope you enjoyed, hope you enjoy the snow (if you got any) and happy polishing! :)
<3katherine

September 29, 2010

PINK POW

New nails today :) It took me a while to figure out what I wanted to do for my nails and I thought of different ideas. I will post in the future manicures that didn't work out for me though because not all my nails always come out perfect.

Bringing leopard/cheetah print back~
nail polishes used:
OPI Pink-A-Doodle
Nabi Pink M. Star
Sally Hansen Twisted Pink
LA Colors Nail Art Black

Here's OPI's Pink-A-Doodle by iteself, it's a shimmery sheer pink. It's soo adorable! The swatch is 3 coats and 1 coat of top coat.


Don't forget to enter in my giveaway ends October 6th~
Hope you enjoyed,
<3katherine

June 22, 2010

Oh Happy Happy

So I found 2 bottles of Sally Hansen in my collection as I reoganized them today. In total, I have 115 bottles, not including top coats, base coats, cuticle oil, Essie matte about you and nail art bottles. That's not that bad but I hope I could get more! :)

Sally Hansen Hard as Nails Xtreme Wear Twisted Pink
hot pink with gold shimmer. the formula was excellent, it looked great with only one coat except for VNL (visible nail line) so I thought I'd be better off with 2 coats. This is 2 coats with 1 coat of Seche top coat.

Sally Hansen Hard as Nails Xtreme Wear Wet Cement
light grey with some taupe. the formula was very good and the drying time wasn't that bad. it's about the same time as my OPI's, Essie's and China Glazes. Love the gray! (: Not much to say about it though ahaha.

OPI Lucky Lucky Lavender
lavender with light pink. two swatches. the formula was good and the application was alright. the second coat evened out the first coat because it was applied unevenly. When I did this swatch, I thought why not and attempted leopard print (second attempt; first one was an epic fail). & then I added China Glaze's Medallion (from their glitter collection) on top. I think I'll do this idea later one hehe. I only did the leopard print on one nail because I was trying it out. :P


Hope you enjoyed,
<3katherine

March 29, 2010

Picture Tutorials

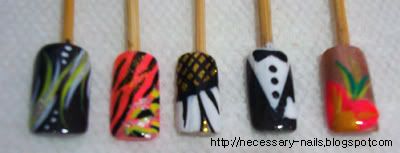
Since I'm horrible at detailing my tutorials - I will just provide pictures of the steps I took to reach the final look of each nail (that I provided a group picture of)


(2). Essie's Lather, Rinse and Repeat Mix Animal Print


(3) Misa's Disco Queen - Flower Tutorial {although the white part looks like teeth, lol}


(4). Misa Wishing on a Star - Tuxedo Suit Tutorial


(5) Misa Teddy Bear - Flower Tutorial