Showing posts with label Tutorial. Show all posts

August 19, 2011

Leopard Tutorial

Hello! Today is a tutorial for leopard/cheetah print! :) You don't necessarily have to use the same color combinations I did, and you can mix and come up with your own. Hope you enjoy! 

First, you start with your base color and in this case, I used Essence Color & Go White Secrets


Next step is to make "random" spots and I used China Glaze Golden Spurs for this. You can make it in different shapes, whether it's like an oval or just a random blotch.


Next I used Kiss Nail Art Paint in Black and slightly made a 'C' on the spot and made a backward C on the other side of the spot BUT not connecting to the first C.


Continue doing this on the other spots and then I added 3 random black spots to fill in the empty space.


And this is the end of the tutorial. Make sure you seal your nail art with top coat but be sure it's dry before you apply the top coat or else it will smear. Sometimes it happens to me even though I let it dry for a long time too. So apply top coat with caution!

I hope you enjoyed and happy polishing! :)
<3katherine

October 6, 2010

Polish Heaven + TUTORIAL!

Hello! I bring to you a TUTORIAL. I haven't done these in a while but I hope I made it easier for everyone to be able to do this! :) Click the picture and the whole tutorial will be clearer to read for you.

I've got TONS of nail polishes to show you, especially my Burlesque Collection that just arrived today!! :) So we'll definitely be busy this month! and maybe next month!! ^______^


My giveaway ends tonight at 11:59PM EST
so do some last minute entering!
*any entries past 11:59PM will not be counted.

hope you enjoyed,
<3katherine

April 23, 2010

Stellare Notte from my love, hehe


I wasn't in a great mood on Wednesday. And on Thursday, my boyfriend decided to make me feel better by buying me a bottle of nail polish from Duane Reade. He got me Borghese Stellare Notte! Though it's only one, his intentions made me happier and brought my mood up :)♥. So I decided to swatch it today before I cut my nails since my nails are uneven and I want to grow them back asap! The color is so unique. It's a charcoal with duo shimmer of purple, blue and green. The swatch shows two coats of Stellare Notte with no top coat. It's definitely a beautiful color and a favorite!

Glitter Gradient with Borghese Stellar Notte
& provided tutorial! :)

(1.) prep nails and put base coat on

(2.) two coats of Stellare Notte

(3.) when it's dry and using your silver glitter nail art, make a silver tip. it doesn't matter the size of it, but if you make it at this size the gradient is bigger.


(4.) before it dries and using CoverGirl Boundless Color Disco Dazzle or anything similar, use the brush from the end of the nail and brush on the nail towards your cuticles.

(5.) after it's dry, put your top coat to seal it.

hope you enjoyed the stellare notte glitter gradient & post comments with your gradients :)


~~~
On a side note, I sent out my old nails polishes for the Zoya exchange today! I'm excited to receive the 20 bottles of Zoya I picked out.

have a great day and see you soon!
<3katherine

April 4, 2010

Cutesy


Essie Steel-ing the Scene is a silver bronze metallic color. For the swatch, I used 3 coats, 2 coats is fine but I wanted to cover the white ends of my nails fully. The formula comes out streaky but when you put on top coat (like the swatch picture) the streaks don't show as much as without top coat. It's a very interesting color and I think goes nice with my skintone. :)

For this week, I did a 'cutesy' style.
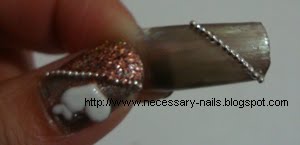
Base is 3 coats of Essie's Steel-ing the Scene and then I used a clear coat in order to line up the silver beads. I then used clear coat again on the bottom area under the beads so that I could use bronze glitter for that area. I added a heart nail sticker on the area on top of the diagonal beads for my ring fingers and thumbs. For the rest of my fingers, I used nail stickers with bows and small silver/gold chains. :)


I hope you liked this week's nails. :) & until next time♥~,
KATHERINE*

-edit- April 4, 2010
I did a tutorial of the nails & I'd like to talk about Katrina's Nail Blog. She's having her first giveaway and I'm so excited because I've been following her on the Nail Thread from Soompi Forums Beauty&Fashion Forum. I absolutely love her nail art and I think she's really talented. I hope I win the giveaway. Even if I don't, I'm glad that she started posting and created a nail blog so it's easier for me to follow and reference her work.

& here's my tutorial:

1. Prep, base coat and 3 coats of Steel-ing the Scene

2. After it dries, put a top coat on. When it's not fully dry, begin lining up the silver beads from one corner to the other. I started from the end because I wanted to save more beads for future use [lol] but you could also start from the corner of of where your cuticles end.


3. Top coat on the beads diagonally on top so they stay and also top coat on the bottom portion under the beads & sprinkle on bronze glitter or any other glitter you prefer.
4. Seal it with top coat so that no glitter falls out & you could add nail stickers like I did on the top portion, leave it alone or do some nail art.

Hope you enjoyed the tutorial and don't forget to follow Katrina's Nail Blog @ http://katrinasnailblog.blogspot.com.

see you soon,
<3katherine


March 29, 2010

Picture Tutorials

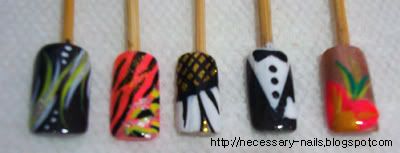
Since I'm horrible at detailing my tutorials - I will just provide pictures of the steps I took to reach the final look of each nail (that I provided a group picture of)


(2). Essie's Lather, Rinse and Repeat Mix Animal Print


(3) Misa's Disco Queen - Flower Tutorial {although the white part looks like teeth, lol}


(4). Misa Wishing on a Star - Tuxedo Suit Tutorial


(5) Misa Teddy Bear - Flower Tutorial


March 23, 2010

March Madness Update

I haven't posted in a while and I thought I'd update my blog on what I've been doing recently. I'm planning to do more tutorials with the haul of China Glaze and Essie polishes that I got previously however, 24 hours isn't enough so these will come slowly. :( So here's an update on my purchase, nail sets/design & tutorial!

recent polish purchase:
- American Apparel Cotton
- American Apparel Hunter
- American Apparel Passport Blue
AND:
* Side story: I haven't shopped at the nail supply store that I've gone to in months & I came across the small place in middle school. So I entered the store and the workers greeted me with a hello. As I looked around - I couldn't decide what polishes to get. I went around and around for about 3-4 times between Dante, OPI and Essie and I hear the door opening and a few girls coming in. I went to look at the Dante polishes where they were and the male worker asked them if they were nail technicians or professionals & that they only sell to them. So I thought in my head, sh*t that means I can't buy anything :(. The girls immediately left after that since they looked obviously a student probably in middle school - since I used to go to middle school around there. After I continued to look around and gathered my courage in hopes of being able to buy the 3 polishes I selected. And to my happiness and hopes, I was able to! Thank goodness because I am no nail technician, student or professional.


-♥-
recent nail sets:
(1) Last week's nails

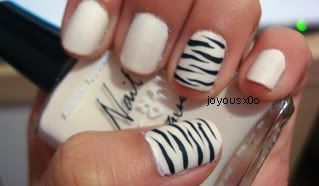
Base: American Apparel Cotton with black nail art to make zebra stripes and topped with Essie Matte About You. - I don't own any whites in my nail polish collection so I decided to get Cotton. It's a very nice white that doesn't make my fingers and hands look weird. The formula is thin since it is from American Apparel. The application was good - not bad. I believe I used 2-3 coats of Cotton to make sure the color was even. I used Essie's MAY to top it off and I absolutely love ittt!~ ^ o ^ The whole design came out so nice & perfect (especially my ring finger which I'm most proud of). The finishing touch was very nice and smooth. The other fingers were also really nice except that the black kind of got smudged when I put on the MAY, since it wasn't fully dry, but nonetheless, one of my favorite designs.

(2) For this week's nails

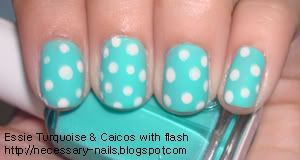
Base: Essie Turquoise & Caicos with white polka dots and topped with Essie Matte About You. - A beautiful color but formula was very thin. This was 3 coats but still came out nice. Not troublesome to apply. I may have overdone the polka dots a bit as I went along, lol! But it's okay - I adore this plain set. The MAY flattened the set but made it very cute. I received a compliment on them hehe ^ o ^ first one since I've started college in August - sad, I know.

-♥-
From the last post - I've only done different sets on the Misa polishes I have - here's a preview / final look & I'll be posting up tutorials on how to do them as soon as I have the posts typed and ready to go. Also there will be more tutorials in the future since I recently restocked on plastic tips to present my tutorials on. :D♥


For my second tutorial, I will present the steps {through pictures} of how I made the first design of the 5 nails in the picture above.

need:
~ Essie Ridge Filler {base coat}
~ Misa Wishing on a Star
~ Color Club NA54 Neon Yellow {nail art}
~ Kiss Nail Art White
~ Kiss Nail Art Silver Glitter
~ Seche Vite Quick Dry Top Coat

prep, base coat and two coats of WOAS.

color club nail art na54 and make swirl-ish strokes

use kiss nail art white to fill in the empty spaces around the neon yellow strokes

nail art silver glitter over the middle white strokes

white dots {mine are uneven x_x} and seal with top coat! ~

Until next time♥~,
KATHERINE*