
Essie Steel-ing the Scene is a silver bronze metallic color. For the swatch, I used 3 coats, 2 coats is fine but I wanted to cover the white ends of my nails fully. The formula comes out streaky but when you put on top coat (like the swatch picture) the streaks don't show as much as without top coat. It's a very interesting color and I think goes nice with my skintone. :)
For this week, I did a 'cutesy' style.
Base is 3 coats of Essie's Steel-ing the Scene and then I used a clear coat in order to line up the silver beads. I then used clear coat again on the bottom area under the beads so that I could use bronze glitter for that area. I added a heart nail sticker on the area on top of the diagonal beads for my ring fingers and thumbs. For the rest of my fingers, I used nail stickers with bows and small silver/gold chains. :)


I hope you liked this week's nails. :) & until next time♥~,
-edit- April 4, 2010
I did a tutorial of the nails & I'd like to talk about Katrina's Nail Blog. She's having her first giveaway and I'm so excited because I've been following her on the Nail Thread from Soompi Forums Beauty&Fashion Forum. I absolutely love her nail art and I think she's really talented. I hope I win the giveaway. Even if I don't, I'm glad that she started posting and created a nail blog so it's easier for me to follow and reference her work.
& here's my tutorial:


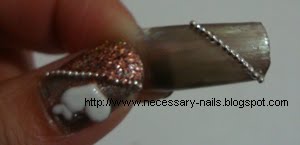
2. After it dries, put a top coat on. When it's not fully dry, begin lining up the silver beads from one corner to the other. I started from the end because I wanted to save more beads for future use [lol] but you could also start from the corner of of where your cuticles end.


3. Top coat on the beads diagonally on top so they stay and also top coat on the bottom portion under the beads & sprinkle on bronze glitter or any other glitter you prefer.
4. Seal it with top coat so that no glitter falls out & you could add nail stickers like I did on the top portion, leave it alone or do some nail art.
Hope you enjoyed the tutorial and don't forget to follow Katrina's Nail Blog @ http://katrinasnailblog.blogspot.com.
see you soon,
<3katherine
I like the 3D bows
ReplyDeletethats SO cute!!! and awesome tutorial =)
ReplyDeleteI love this!! I can't wait to try it!!
ReplyDelete